Exposing Kubernetes Services Securely with Cloudflare Operator and GitOps
On my last blog post, I explained why Exposing your public IP for your homelab is a bad Idea and introduced Cloudflare Tunnels as a great alternative to securely expose your services. In this blog post, we will dive into how to expose services from your Kubernetes cluster to the internet securely using an awesome project called Cloudflare Operator.
Why Use Cloudflare Operator?
Cloudflare Operator simplifies the integration of Cloudflare Tunnels with your Kubernetes cluster. It allows you to:
- Manage Cloudflare DNS records directly from your cluster.
- Create secure tunnels to expose your Kubernetes services without exposing your public IP.
- Automate the creation of tunnels and DNS entries, reducing manual configuration.
If you are already familiar with Kubernetes manifests and want a seamless way to integrate Cloudflare's powerful tools into your setup, Cloudflare Operator is a must-try.
Prerequisites
Before we get started, ensure you have:
- A Kubernetes cluster set up (minikube, kind, or a home lab cluster).
kubectlinstalled and configured.- A Cloudflare account with an active domain.
- Your Cloudflare API token with permissions to manage DNS and tunnels.
- FluxCD (check my other blog post if you want to set it up).
Installing Cloudflare Operator
CloudFlare Operator introduces powerful Custom Resource Definitions (CRDs) that enable us to manage tunnels and DNS entries directly within our Kubernetes cluster. To get started, we'll first need to install these CRDs into the cluster. For better organization, we’ll structure our FluxCD repository to separate tooling from application-specific configurations.
Structuring the FluxCD Repository
At the root level of our FluxCD repository, we will create an infrastructure directory, which will house essential tools and resources for our applications. Inside infrastructure, we'll define two subdirectories:
base/→ Contains general configurations that are reusable across multiple clusters.kthulu/→ Contains cluster-specific configurations forkthulu, our designated cluster.
This structure ensures a clear separation of concerns, making it easier to maintain and scale configurations.
Repository Structure
.
├── README.md
├── apps
│   ├── base
│   └── kthulu
├── clusters
│   └── kthulu
├── infrastructure
│   ├── base
│   └── kthulu
└── monitoring
    └── controllers
Deploying Cloudflare Operator with GitOps
Step 1: Defining the Git Source for Cloudflare Operator
Under infrastructure/base, create a new directory called cloudflare-operator. Instead of manually applying Cloudflare Operator’s manifests, we will fetch them dynamically from the upstream repository using FluxCD.
Create cf-operator-source.yaml in base/cloudflare-operator:
apiVersion: source.toolkit.fluxcd.io/v1beta2
kind: GitRepository
metadata:
  name: cloudflare-operator
  namespace: flux-system
spec:
  interval: 5m
  url: https://github.com/adyanth/cloudflare-operator.git
  ref:
    branch: main
This manifest instructs FluxCD to pull updates every 5 minutes from the official cloudflare-operator repository.
Step 2: Applying Cloudflare Operator with FluxCD
Now, we need a Kustomization manifest that tells FluxCD how to deploy the Cloudflare Operator from our source repository.
Create cf-operator-kustomization.yaml in base/cloudflare-operator:
apiVersion: kustomize.toolkit.fluxcd.io/v1
kind: Kustomization
metadata:
  name: cloudflare-operator
  namespace: flux-system
spec:
  interval: 10m
  path: "./config/default"
  prune: true
  sourceRef:
    kind: GitRepository
    name: cloudflare-operator
  targetNamespace: default
**interval: 10m**→ Ensures updates are checked every 10 minutes.**path: "./config/default"**→ Specifies where to pull the deployment files from.**prune: true**→ Ensures obsolete resources are automatically removed.**sourceRef**→ References the GitRepository defined earlier.
Step 3: Defining Namespace for Cloudflare Operator
Next, let's define a namespace where the Cloudflare Operator will be deployed.
Create cf-operator-namespace.yaml in base/cloudflare-operator:
apiVersion: v1
kind: Namespace
metadata:
  name: cloudflare-operator-system
Step 4: Aggregating the Manifests with Kustomization
To ensure FluxCD processes all necessary manifests in the correct order, we will define a kustomization.yaml file.
Create kustomization.yaml in base/cloudflare-operator:
apiVersion: kustomize.config.k8s.io/v1beta1
kind: Kustomization
namespace: cloudflare-operator-system
resources:
  - cf-operator-namespace.yaml
  - cf-operator-source.yaml
  - cf-operator-kustomization.yaml
This file ensures that:
✅ The namespace is created first.
✅ The Git source is applied.
✅ The Kustomization file for deployment is processed.
Step 5: Integrating Cloudflare Operator into the kthulu Cluster
Now that we have defined the Cloudflare Operator in base, we need to apply it to the kthulu cluster by referencing it in the infrastructure/kthulu directory.
Create kustomization.yaml in infrastructure/kthulu/cloudflare/operator:
apiVersion: kustomize.config.k8s.io/v1beta1
kind: Kustomization
namespace: cloudflare-operator-system
resources:
  - ../../base/cloudflare-operator
This ensures that the base configuration of Cloudflare Operator is inherited by the kthulu cluster.
Step 6: Defining Cluster-Wide Infrastructure Deployment
Finally, we need to register the Cloudflare Operator deployment as part of the kthulu cluster’s infrastructure configuration.
Create infrastructure.yaml in clusters/kthulu:
apiVersion: kustomize.toolkit.fluxcd.io/v1
kind: Kustomization
metadata:
  name: infrastructure
  namespace: flux-system
spec:
  interval: 10m0s
  sourceRef:
    kind: GitRepository
    name: flux-system
  path: ./infrastructure/kthulu
  prune: true
  wait: true
  timeout: 5m0s
interval: 10m0s→ Ensures infrastructure updates are checked every 10 minutes.sourceRef→ Specifies the FluxCD repository managing the cluster.path: ./infrastructure/kthulu→ Defines where infrastructure manifests are stored.prune: true→ Removes outdated resources automatically.wait: true→ Ensures deployments complete before moving to the next step.timeout: 5m0s→ Prevents deployments from hanging indefinitely.
Commit changes
Now that we have configured our cloudflare operator we just need to commit our changes, push them into main and wait until FluxCD reconciles the state:
$ git commit -m "feat: Adding Cloudflare operator and infrastructure directory"

$ git push origin main
And check for our Flux changes:
➜ flux get kustomizations
NAME                    REVISION                SUSPENDED       READY   MESSAGE
apps                    main@sha1:6c3de80b      False           True    Applied revision: main@sha1:6c3de80b
flux-system             main@sha1:6c3de80b      False           True    Applied revision: main@sha1:6c3de80b
infrastructure          main@sha1:6c3de80b      False           True    Applied revision: main@sha1:6c3de80b
Now we have CloudFlare Operator configured! Let's use it to expose Linkding.
Exposing Linkding through cloudflare tunnels
Step 1: Creating a Secret with Cloudflare Credentials
First, you need to create a Kubernetes secret that stores your Cloudflare API key and token. Refer to the official Cloudflare Operator documentation for instructions on how to create these tokens.
Use the following command to create the secret:
kubectl -n cloudflare-operator-system create secret generic cloudflare-secrets --from-literal CLOUDFLARE_API_TOKEN=<api-token> --from-literal CLOUDFLARE_API_KEY=<api-key>
Ensure you replace <api-token> and <api-key> with your actual Cloudflare token and API key.
Step 2: Creating a ClusterTunnel Resource
The next step is to create a ClusterTunnel resource. This resource defines the tunnel configuration for the cluster, allowing you to reuse it across different services with unique domain names.
Create a new YAML file under infrastructure/kthulu named cluster-tunnel.yaml:
apiVersion: networking.cfargotunnel.com/v1alpha1
kind: ClusterTunnel
metadata:
  name: k3s-cluster-tunnel
spec:
  newTunnel:
    name: kthulu-tunnel
  size: 2
  cloudflare:
    email: <email_associated_with_cloudflare_account>
    domain: barlabs.tech
    secret: cloudflare-secrets
    # accountId and accountName cannot be both empty. If both are provided, Account ID is used if valid, else falls back to Account Name.
    accountId: c7e22d8517cb8c73d3665670e9a7f673
Replace the placeholders with your Cloudflare account information:
<email_associated_with_cloudflare_account>: The email associated with your Cloudflare account.accountId: Your Cloudflare account ID.
Step 3: Creating a TunnelBinding Resource
To expose the Linkding application, create a TunnelBinding resource that maps the tunnel to your service and automatically creates DNS records.
Create a YAML file under apps/kthulu/linkding named cloudflare.yaml:
apiVersion: networking.cfargotunnel.com/v1alpha1
kind: TunnelBinding
metadata:
  name: linkding-tunnel
  namespace: linkding
subjects:
  - name: linkding # Name of our service
tunnelRef:
  kind: ClusterTunnel
  name: k3s-cluster-tunnel
Explanation of Fields:
subjects.name: The name of your Linkding service running in the Kubernetes cluster.port: The port on which your service is listening. Update this if necessary.tunnelRef.name: The name of theClusterTunnelcreated earlier.
Step 4: Deploying the Configuration
Once you have defined both the ClusterTunnel and TunnelBinding, you can deploy them using GitOps or manual application.
Commit and push the configuration:
git commit -am "feat: Adding cloudflare configuration and tunnnel for linkding"
git push origin main
Step 5: Verifying the Deployment
To check if the resources have been created successfully, run the following commands:
➜ k get ClusterTunnel
NAME                 TUNNELID
k3s-cluster-tunnel   275ab74c-2cfa-4fca-9b83-356a6cb29d55
 k get TunnelBinding -n linkding
NAME              FQDNS
linkding-tunnel   linkding.barlabs.tech
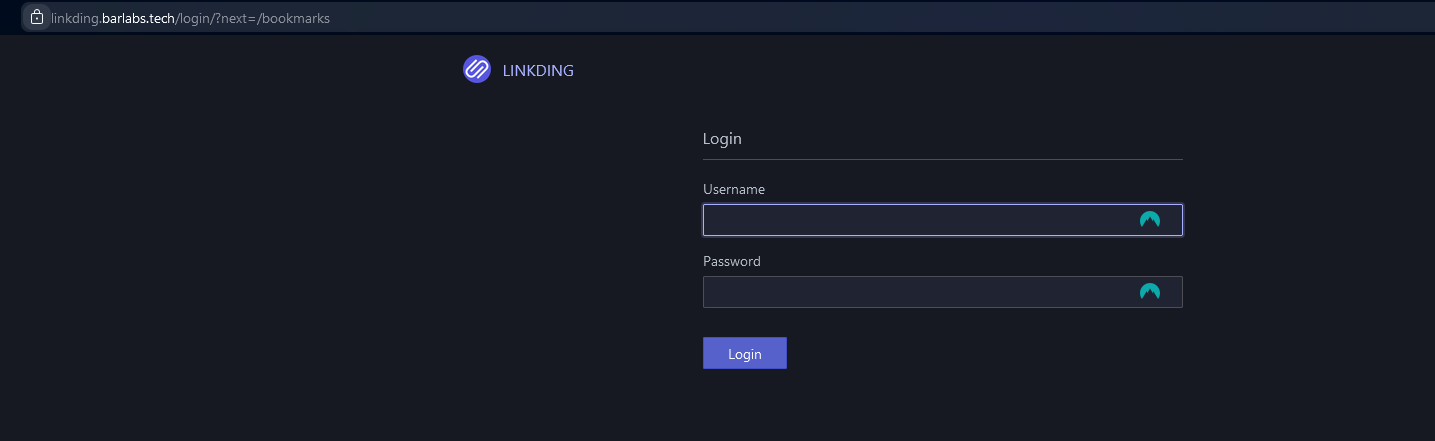
Step 6: Accessing the Application
Once the DNS records have been propagated, you can access your Linkding instance using the configured domain (e.g., https://linkding.barlabs.tech).
Cloudflare will automatically handle HTTPS termination, so your service is securely exposed without any additional SSL configuration.
Wrapping up
By leveraging a few simple YAML configurations, you can efficiently and securely expose internal services, such as Linkding, using Cloudflare Tunnels. This setup not only streamlines DNS management but also fortifies your system’s security by eliminating the need for public IP exposure or complex ingress configurations. As an added advantage, this approach is highly adaptable—allowing you to extend it seamlessly to other applications within your Kubernetes cluster. Whether you're managing a small home lab or a large-scale environment, Cloudflare Tunnels provide a scalable, secure, and simplified solution to meet your networking needs.