Running a Kubernetes Cluster at Home | Part II
Deploying Kubernetes in an on-premises environment offers various options depending on your needs and technical expertise. You can use kubeadm (the tool often associated with the Certified Kubernetes Administrator (CKA) certification), minikube, or even Talos. For this setup, I chose K3s because it’s simple, lightweight, and incredibly easy to configure.
In this post, I’ll demonstrate how to deploy a basic Kubernetes cluster with one control plane node and three worker nodes. While this setup is functional, it’s not highly available—meaning if the control plane fails, the entire cluster goes down. Before diving into the implementation, let’s revisit Kubernetes architecture to understand why this is an issue.
Revisiting Kubernetes Architecture
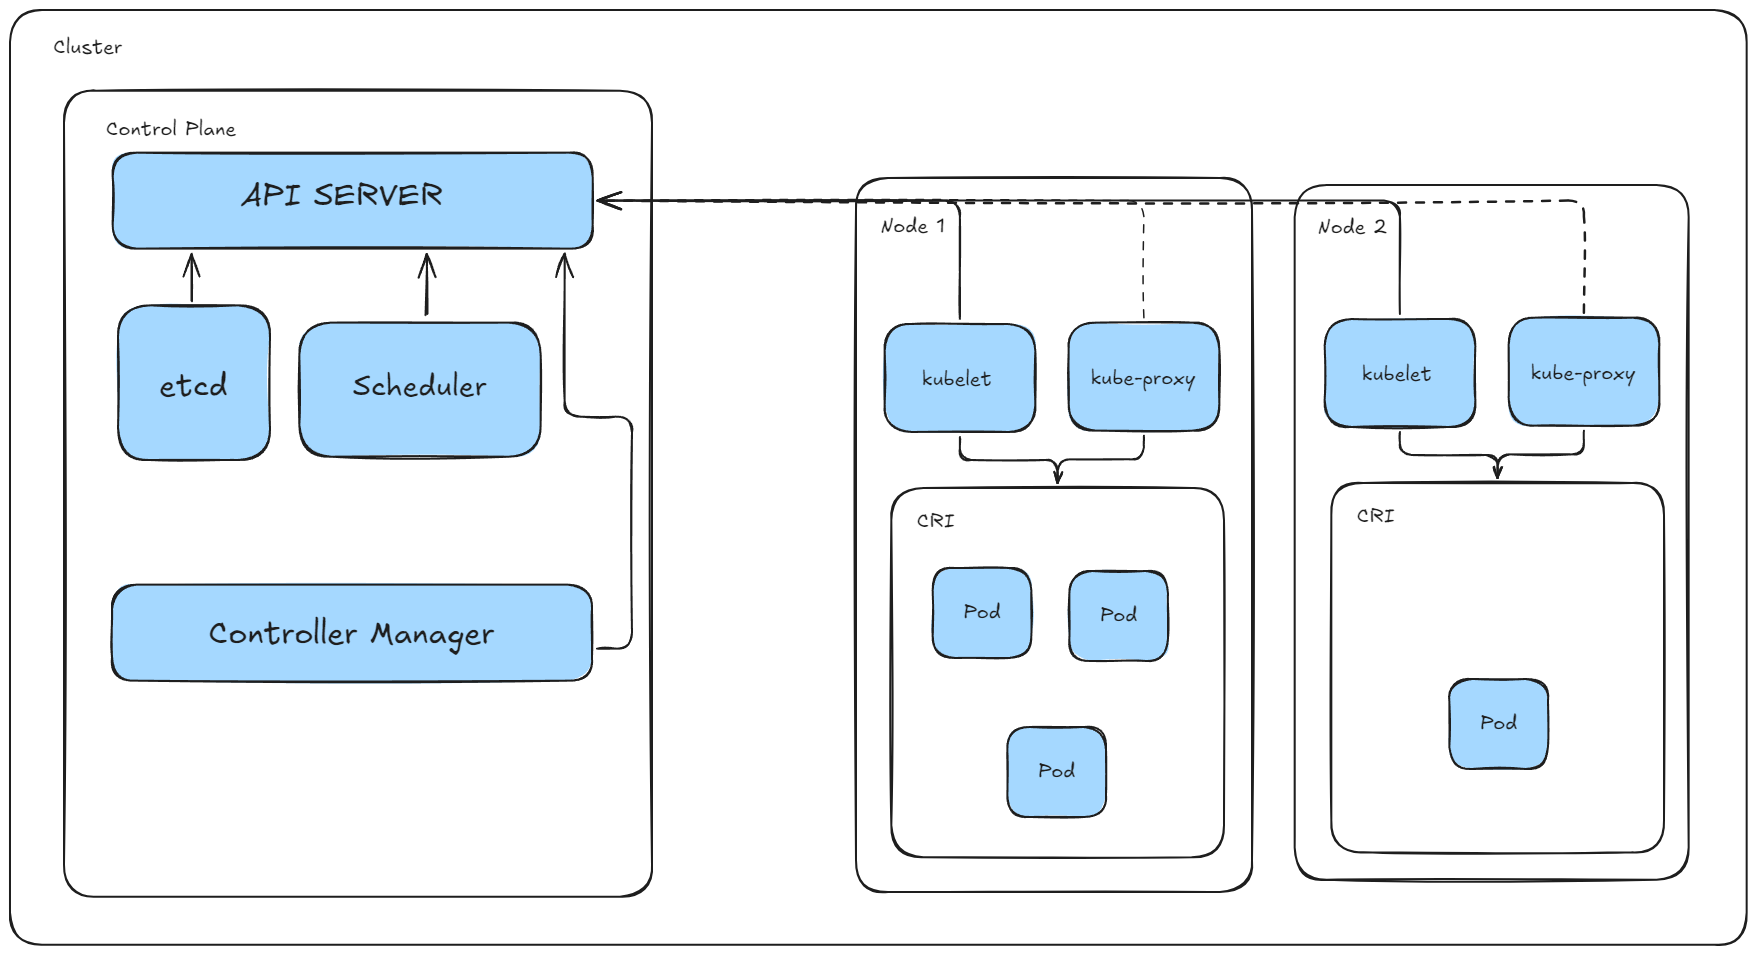
The control plane is the brain of Kubernetes. It manages the cluster state and orchestrates operations through key components:
- API Server: The front door for all Kubernetes operations.
- Scheduler: Allocates resources for workloads based on policies.
- Controller Manager: Ensures desired state by running control loops.
etcd: A distributed key-value store that serves as Kubernetes’ source of truth.
All critical cluster data is stored in etcd. When running multiple control planes, etcd operates as a distributed system. If one control plane fails, the remaining instances ensure the cluster remains operational, with no loss of state or configuration. However, in a single control plane setup, the entire cluster is vulnerable to downtime if that node fails.
The Trade-offs of Using K3s
By default, K3s uses SQLite instead of etcd for its datastore. While SQLite is lightweight and simpler to manage, it lacks the distributed and highly available properties of etcd. In our current setup, the single control plane node means:
- If the control plane crashes, the Kubernetes API becomes unavailable.
- Worker nodes remain operational but cannot process updates or new workloads.
- The cluster is effectively down until the control plane is restored.
This setup is adequate for getting started with Kubernetes, but it’s not production-ready. In future iterations, we’ll address these limitations by:
- Adding additional control plane nodes to achieve high availability (HA).
- Migrating the datastore from SQLite to etcd for a robust, distributed setup.
Preparing our machines
As of now, I have four machines ready to run Linux and serve as the foundation for our Kubernetes cluster. My operating system of choice for this setup is Ubuntu Server due to its reliability and compatibility with Kubernetes. During the installation process, it's essential to assign each node a unique name to ensure seamless integration into the cluster without naming conflicts. By default, the operating system's hostname is used to name the node, but you can also define an environment variable for K3s to use instead. In my setup, I've named the four machines as follows:
- k8s-cthulhu-1 (control plane)
- k8s-deepone-worker-1 (worker node)
- k8s-deepone-worker-2 (worker node)
- k8s-deepone-worker-3 (worker node)
Generating SSH Keys
Before diving into cluster deployment, let's set up secure access to the nodes. Start by generating an SSH key that will be used to authenticate across all machines. I opted to use a single SSH key for simplicity. Run the following command and store the generated key in a safe location:
ssh-keygen
Example output:
➜ ssh-keygen
Generating public/private ed25519 key pair.
Enter file in which to save the key (/home/mustybatz/.ssh/id_ed25519): .ssh/k8s-machines
Enter passphrase (empty for no passphrase):
Enter same passphrase again:
Your identification has been saved in .ssh/k8s-machines
Your public key has been saved in .ssh/k8s-machines.pub
The key fingerprint is:
SHA256:gQRzDeO+qKhIwbh0Us8ujG2yyhEFtKssSYWC664taNo mustybatz@DURANGO
The key's randomart image is:
+--[ED25519 256]--+
|.o  o.=o         |
|. +  = o.        |
|oo +  o .        |
|+.= o.   .       |
|oO . o. S        |
|*oO .. .         |
|*B =...          |
|O==..            |
|&=E              |
+----[SHA256]-----+
Distributing the SSH Key
With the SSH key generated, the next step is to copy it to each machine to enable password-less SSH login. Use the ssh-copy-id utility for this:
ssh-copy-id mustybatz@192.168.100.54
Repeat this command for every machine in your cluster. After copying the key, verify that you can log in without entering credentials:
➜ ssh 'mustybatz@192.168.100.54'
Welcome to Ubuntu 24.04.1 LTS (GNU/Linux 6.8.0-51-generic x86_64)

 * Documentation:  https://help.ubuntu.com
 * Management:     https://landscape.canonical.com
 * Support:        https://ubuntu.com/pro

 System information as of Tue Jan 21 09:33:35 PM UTC 2025

  System load:             0.0
  Usage of /:              6.5% of 97.87GB
  Memory usage:            3%
  Swap usage:              0%
  Temperature:             63.0 C
  Processes:               213
  Users logged in:         0
  IPv4 address for enp1s0: 192.168.100.54
  IPv6 address for enp1s0: 2806:261:417:1e2d:ea39:35ff:fe30:906a

 * Strictly confined Kubernetes makes edge and IoT secure. Learn how MicroK8s
   just raised the bar for easy, resilient and secure K8s cluster deployment.

   https://ubuntu.com/engage/secure-kubernetes-at-the-edge

Expanded Security Maintenance for Applications is not enabled.

0 updates can be applied immediately.

Enable ESM Apps to receive additional future security updates.
See https://ubuntu.com/esm or run: sudo pro status


Last login: Tue Jan 21 20:36:03 2025 from 192.168.100.2
Automating Cluster Setup with Ansible
While we could manually install K3s on each machine at this point, manual configuration is tedious and error-prone, especially if you need to rebuild the cluster in the future (and let's face it—this will happen). Instead, I recommend automating the setup process with Ansible. By using an Ansible playbook, you can:
- Reinstall Ubuntu Server on the machines and quickly reapply the cluster configuration.
- Adjust Kubernetes deployment settings directly within the playbook, ensuring that changes are consistently applied across all nodes.
This approach not only streamlines the initial setup but also provides a robust framework for maintaining and updating your Kubernetes cluster over time.
Ansible Time!
Setting Up Our Directory Structure
To get started, let's create a new directory and organize it with the following structure:
provision-k3s/
├── inventory.yaml
├── playbook.yaml
├── roles/
│   ├── control-plane/
│   │   └── tasks/
│   │       └── main.yaml
│   ├── nodes/
│       └── tasks/
│           └── main.yaml
Inventory File
We'll create an inventory file to specify the IPs and SSH keys for all machines. For initial testing, I'll use a simple Vagrant setup to create four virtual machines. These VMs are temporary and will be deleted after testing the playbook.
Example inventory.yaml file:
control-planes:
  vars:
    # Global SSH and interpreter settings
    ansible_user: vagrant
    ansible_ssh_common_args: "-o StrictHostKeyChecking=no"
  hosts:
    master:
      ansible_host: 192.168.3.105
      ansible_ssh_private_key_file: /home/mustybatz/.ssh/master_private_key

nodes:
  hosts:
    node1:
      ansible_host: 192.168.3.106
      ansible_ssh_private_key_file: /home/mustybatz/.ssh/node1_private_key

    node2:
      ansible_host: 192.168.3.107
      ansible_ssh_private_key_file: /home/mustybatz/.ssh/node2_private_key

    node3:
      ansible_host: 192.168.3.108
      ansible_ssh_private_key_file: /home/mustybatz/.ssh/node3_private_key
Creating Roles
Control Plane Role
The control plane role installs K3s, retrieves the join token, and saves the control plane’s IP address for use by the nodes.
roles/control-plane/tasks/main.yaml:
- name: Install K3s on the control plane
  shell: |
    curl -sfL https://get.k3s.io | sh -s - --write-kubeconfig-mode 644
  args:
    executable: /bin/bash

- name: Retrieve the K3s join token
  shell: cat /var/lib/rancher/k3s/server/node-token
  register: k3s_token
  changed_when: false

- name: Save K3s join token
  set_fact:
    k3s_join_token: "{{ k3s_token.stdout }}"

- name: Gather control plane IP
  set_fact:
    k3s_server_ip: "{{ ansible_host }}"
Node Role
The node role joins the nodes to the K3s cluster using the control plane’s join token and IP address.
roles/node/tasks/main.yaml:
- name: Join the K3s cluster
  shell: |
    curl -sfL https://get.k3s.io | K3S_URL=https://{{ hostvars['master']['k3s_server_ip'] }}:6443 K3S_TOKEN={{ hostvars['master']['k3s_join_token'] }} sh -
  args:
    executable: /bin/bash
Running the Playbook
To execute the playbook and provision the cluster, run:
ansible-playbook -i inventory.yaml playbook.yaml
Verifying the Cluster
Once the playbook finishes, SSH into the master node and check the status of your cluster:
vagrant@k3s-master:~$ kubectl get nodes
Expected output:
NAME         STATUS   ROLES                  AGE   VERSION
k3s-master   Ready    control-plane,master   39m   v1.31.4+k3s1
k3s-node1    Ready    <none>                 39m   v1.31.4+k3s1
k3s-node2    Ready    <none>                 39m   v1.31.4+k3s1
k3s-node3    Ready    <none>                 39m   v1.31.4+k3s1
With this setup, we now have a fully functional K3s cluster that can be reprovisioned as needed. This basic playbook serves my current requirements, but I plan to enhance it as the project evolves.
Deploying to our physical machines
Now that I’ve developed the playbook and ensured everything is configured correctly, it’s time to execute the playbook against my inventory, which is set up to point to my physical machines. Here's what my inventory file looks like:
all:
  vars:
    # Global SSH
    ansible_user: mustybatz
    ansible_ssh_common_args: "-o StrictHostKeyChecking=no"
    ansible_ssh_private_key_file: /home/mustybatz/.ssh/id_ed25519.pub
  children:
    control-planes:
      hosts:
        k8s-cthulhu-1:
          ansible_host: 192.168.100.54

    nodes:
      hosts:
        k8s-deepone-worker-1:
          ansible_host: 192.168.100.77

        k8s-deepone-worker-2:
          ansible_host: 192.168.100.80

        k8s-deepone-worker-3:
          ansible_host: 192.168.100.82
The inventory defines one control plane node and three worker nodes for a Kubernetes cluster, with Ansible configured to connect via SSH using my private key.
To run the playbook, we use the following command:
ansible-playbook -i inventory.yaml playbook.yaml -K
The -K flag is used to provide the Become password when the playbook is executed. This approach avoids hard coding sensitive credentials in your files, maintaining security best practices.
Verifying the Kubernetes Cluster
With the playbook successfully executed, Kubernetes is now installed on my home-lab. To verify the cluster, I SSH into the control plane node and check the status of the cluster nodes:
mustybatz@k8s-cthulhu-1:~$ kubectl get nodes
NAME                   STATUS   ROLES                  AGE     VERSION
k8s-cthulhu-1          Ready    control-plane,master   4m14s   v1.31.4+k3s1
k8s-deepone-worker-1   Ready    <none>                 102s    v1.31.4+k3s1
k8s-deepone-worker-2   Ready    <none>                 102s    v1.31.4+k3s1
k8s-deepone-worker-3   Ready    <none>                 95s     v1.31.4+k3s1
As shown above, all nodes are up, running, and ready to take on workloads. At this point you should copy the /etc/rancher/k3s/k3s.yaml file to your machine and change the IP address to your actual control plane IP, this would allow you to execute kubectl commands outside the cluster.
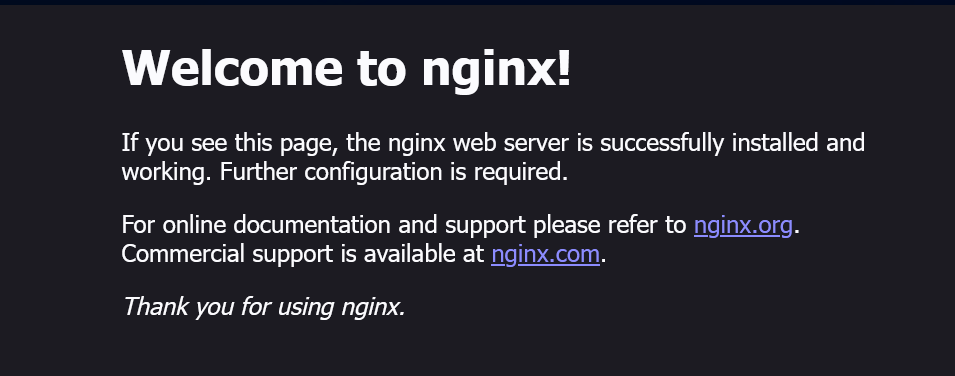
Testing the Cluster with a Pod
To ensure that the cluster is functioning correctly and can run containers, I deploy a simple NGINX pod using the following command:
kubectl run nginx-test --image=nginx:latest --restart=Never --port=80
After deploying the pod, I forward the port so I can access it from my browser:
kubectl port-forward pod/nginx-test 8080:80
By opening my browser and navigating to http://localhost:8080, I can see the default NGINX welcome page, confirming that the deployment was successful and the cluster is operational.
Wrapping Up
In this post, we walked through the process of automating a Kubernetes installation using Ansible, testing the cluster by deploying a simple containerized application, and verifying its functionality. This approach not only saves time but also ensures consistency across multiple deployments.
In the next blog post, we’ll dive deeper into FluxCD and the concept of GitOps to explore how to manage Kubernetes clusters declaratively and improve deployment workflows. Stay tuned!